If you have many OpenVPN config files, adding them once at a time is tedious. Here’s how to add them all at once with a bash script.
Step 1: Download OpenVPN Configuration files from FoxyProxy
If you don’t already have OpenVPN config files for your FoxyProxys servers, download them from the FoxyProxy Control Panel. Login and select “Click here to download all Tunneblick/OpenVPN files as zip.” If you have any trouble downloading the files, contact FoxyProxy Support and we’ll be glad to email it to you.
Unzip the files. They files are used in Step 4.
Step 2: Create script
Open Ubuntu’s Text Editor and paste this script:
#!/bin/bash

# import-openvpn.sh
# Usage: ./import-openvpn.sh [--delete-vpn] <directory-for-ovpn-files>
#   Note: --delete-vpn deletes all VPN connections, not just FoxyProxy OpenVPN ones

# Check for --delete-vpn flag
delete_vpn=false
if [[ "$1" == "--delete-vpn" ]]; then
    delete_vpn=true
    shift  # Shift arguments so that the rest are treated as .ovpn file paths
fi

# Check if directory is provided
if [ -z "$1" ]; then
    echo "Usage: $0 [--delete-vpn] <directory-for-ovpn-files>"
    echo "Note: --delete-vpn deletes all VPN connections, not just OpenVPN ones"
    exit 1
fi

directory=$1
# Verify the directory exists
if [ ! -d "$directory" ]; then
    echo "The specified directory does not exist."
    exit 1
fi

# Check if there are any .ovpn files in the specified directory
shopt -s nullglob  # Enable nullglob to avoid the pattern expanding to itself if no files match
ovpn_files=("$directory"/*.ovpn)

if [ ${#ovpn_files[@]} -eq 0 ]; then
    echo "No .ovpn files found in the directory."
    exit 1
fi
shopt -u nullglob  # Disable nullglob after checking

# Credentials prompts
read -p "Enter FoxyProxy username: " username
# Prompt user for password twice
read -p "Enter FoxyProxy password: " -s password1
echo
read -p "Confirm password: " -s password2
echo

# Strip any leading/trailing whitespace or newlines
password1=$(echo -n "$password1")
password2=$(echo -n "$password2")

# Compare the passwords
if [ "$password1" != "$password2" ]; then
    echo "Passwords do not match"
    exit 1
fi

# If delete_vpn is true, delete all existing VPN connections
if [ "$delete_vpn" = true ]; then
    echo "Deleting all existing VPN connections..."
    # Retrieve all VPN connection UUIDs
    vpn_uuids=$(nmcli -g UUID,TYPE connection show | grep vpn | cut -d: -f1)

    # Delete each VPN connection by UUID
    for uuid in $vpn_uuids; do
        echo "Deleting VPN connection with UUID: $uuid"
        sudo nmcli connection delete uuid "$uuid"
    done
fi

# Initialize counter to track number of ovpn files processed
updated_count=0

# Process .ovpn files
for path in "$directory"/*.ovpn
do
    name=$(basename "$path" ".ovpn")

    # Check if the connection with the same name already exists
    existing_connection=$(nmcli connection show "$name" 2>/dev/null)

    # If connection exists, delete it before importing the new one
    if [ -n "$existing_connection" ]; then
        echo "Connection '$name' already exists. Deleting the old connection before importing new."
        sudo nmcli connection delete "$name"
    fi

    # Import the new VPN connection setting
    echo "Importing OpenVPN connection: '$name'"
    sudo nmcli --terse connection import type openvpn file "$path" > /dev/null

    # Modify the connection with username and password
    sudo nmcli connection modify "$name" vpn.persistent true
    sudo nmcli connection modify "$name" vpn.user-name "$username"
    sudo nmcli connection modify "$name" +vpn.data "password-flags = 0, username = $username"
    sudo nmcli connection modify "$name" +vpn.secrets "password=$password1"

    # Increment the counter
    updated_count=$((updated_count + 1))
done

echo "$updated_count OpenVPN connection settings have been successfully imported."
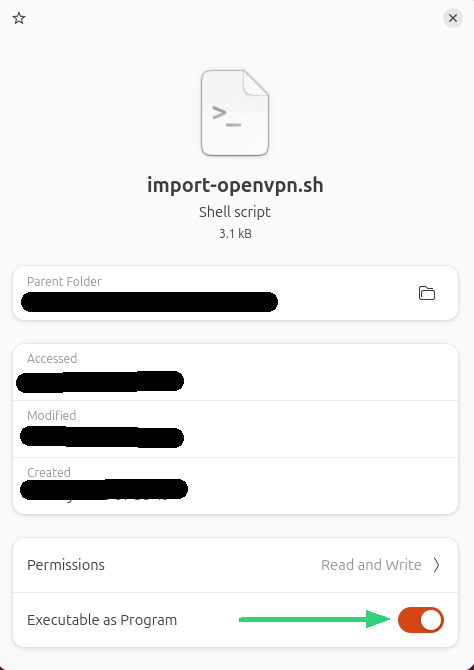
Step 3: Save the script and give it executable permission
Save the Text Editor as a file with the name import-ovpn.sh anywhere you have write access, but preferably in the same directory where the .ovpn files from Step 1 are also saved. Then give import-ovpn.sh executable permission. Right-click on the file in Nautilus (Ubuntu’s file manager), select Properties, and enable Executable as Program:
Step 4: Run the script
Open a terminal and run the script. You will be prompted for a sudo password since the script requires sudo access to execute nmli. Arguments and options for the script are:
$ ./import-openvpn.sh
Usage: ./import-openvpn.sh [--delete-vpn] <directory-for-ovpn-files>
Note: --delete-vpn deletes all VPN connections, not just FoxyProxy OpenVPN ones
Here is sample execution and output. Note the period at end of line indicating the .ovpn files are in the current directory. The –delete-vpn flag deletes all VPN connections, not just FoxyProxy OpenVPN connections!
$ ./import-ovpn.sh --delete-vpn .
Enter FoxyProxy username: aceventura
Enter FoxyProxy password:
Confirm password:
Deleting all existing VPN connections...
Deleting VPN connection with UUID: d920dee5-f93b-46ea-bafe-352cfa15e570
[sudo] password for martinfowler:
Connection 'Monagolia-Ulaanbaatar' (d920dee5-f93b-46ea-bafe-352cfa15e570) successfully deleted.
Importing OpenVPN connection: 'Uganda-Kampala-2'
Importing OpenVPN connection: 'VietNam-Hanoi-35'
Importing OpenVPN connection: 'Myanmar-Naypyidaw-4'
Importing OpenVPN connection: 'Tehran-Iran-6'
...
...
1612 OpenVPN connection settings have been successfully imported.
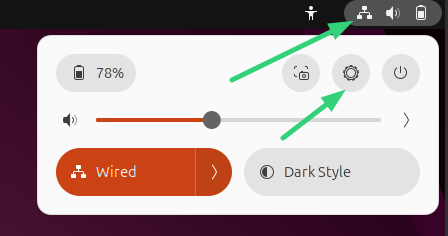
Step 5: Connect / Disconnect
Open Settings -> Network. There are several ways to do this. Here is one. Click the network icon in the taskbar, then the gear icon. See the green arrows in this screenshot. Network settings can also be opened from the desktop Show Apps icon and then searching for Settings.
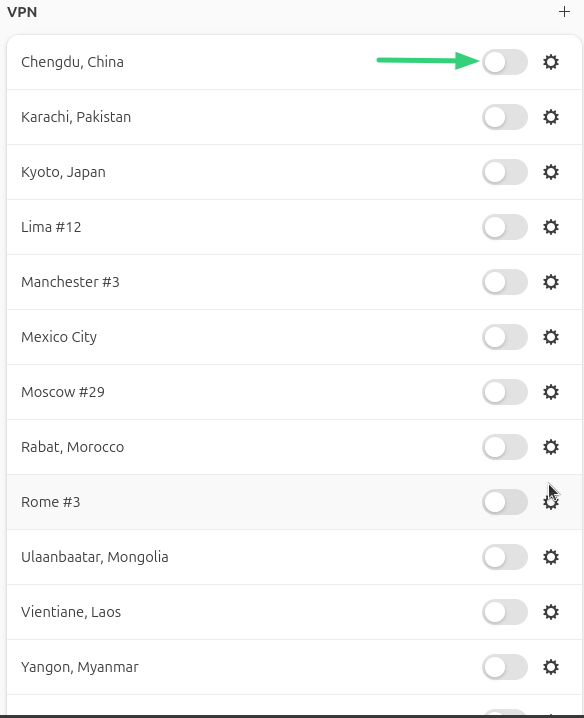
Connect or disconnect with these screens If you have many servers, not all of them may appear in the taskbar list. However, the Network Settings screen shows all VPN servers.
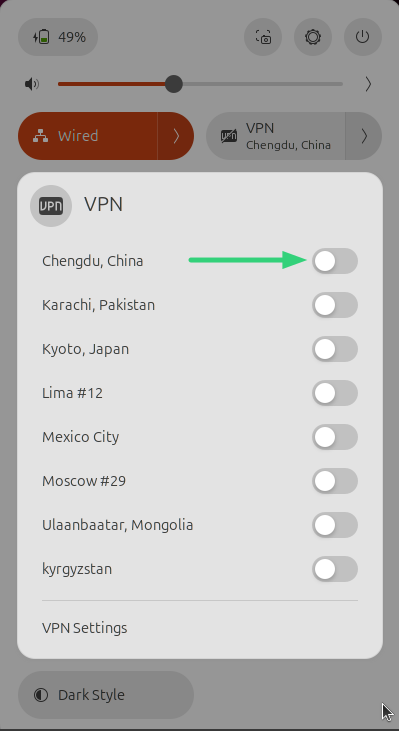
Network Settings (complete list):
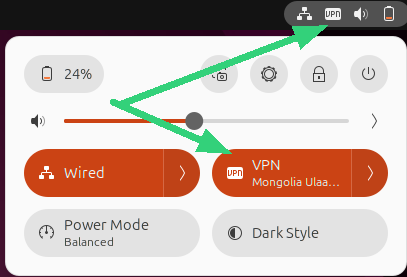
If the connection succeeds, look for the VPN icon in the task bar. You can click it to see which VPN connection is active: